How DICloak and IPOASIS Simplify and Secure Your Multi-Account Management
For marketers, businesses, and individuals managing multiple social media accounts or running affiliate campaigns, DICloak and IPOASIS offer a streamlined solution. DICloak, an antidetect browser, combined with IPOASIS, a high-quality proxy service, creates a secure, efficient system for account management and digital identity protection. This article provides a step-by-step guide on using DICloak and IPOASIS together, highlighting the simple process of integrating proxies for seamless functionality.
Why DICloak and IPOASIS?
DICloak offers similar functionality and stable performance as other antidetect browsers on the market, making it suitable for various fields of activity. It encompasses all the essential key features while being significantly more budget-friendly. Users benefit from robust management capabilities for multiple accounts, efficient teamwork, and convenient import/export options for profiles, proxies, and cookies. In addition, the user interface of DICloak is notably simple and user-friendly, setting it apart from other browsers that tend to be cluttered with excessive details. On the other hand, IPOASIS offers a reliable proxy service, essential for managing multiple accounts by masking your real IP address and simulating varied geographic locations. This helps prevent account bans and ensures secure, smooth browsing. When paired with DICloak, IPOASIS makes multi-account management easier and more secure.
Integrating IPOASIS Proxies into DICloak
Selecting Proxies from IPOASIS
IPOASIS provides a variety of proxy options, including residential, mobile, and datacenter proxies, each tailored for specific needs:
- Residential Proxies: Sourced from real residential IPs, ideal for managing social media or accessing region-specific content undetected.
- Mobile Proxies: Offering mobile IP addresses, perfect for mobile marketing or app testing needs.
- Datacenter Proxies: Known for their speed and reliability, making them a great choice for data scraping or bulk automation tasks.
Once you've chosen the proxy type that fits your requirements, simply purchase a plan on IPOASIS. Afterwards, you'll receive a list of proxies with IP addresses, ports, and login credentials.
Adding Proxies to DICloak
Integrating IPOASIS proxies into DICloak is simple and requires no advanced technical knowledge:
- Access Proxy Settings: After logging into DICloak, find “Proxy Settings” in the left navigation bar. Click on “Create Proxy” to add a new proxy.
- Enter Proxy Information: Input the proxy details provided by IPOASIS, including the proxy type, port number, username, and password. DICloak supports multiple proxy types—HTTP, HTTPS, SOCKS5, and IPFLY—so ensure you select the correct type according to your IPOASIS settings.
- Test the Proxy: DICloak offers a built-in tool to test the proxy connection. This helps verify that the proxy is active and that your browser profile is routing through the correct IP address.
- Save Settings: Once the proxy is successfully verified, save the settings for the browser profile. Repeat these steps for any additional profiles, making sure each uses a different IPOASIS proxy.
Using DICloak and IPOASIS for Multi-Account Management
Downloading and registering
Head over to the DICloak website and download the App on your device. The app is available for MacOS and Windows versions. Register for an account with Google, Telegram, or e-mail. You will need to enter an OTP code for e-mail sign-up.
Creating a browser profile with a proxy
After logging in, you will be redirected to the browser profile page. Profiles are isolated browser sessions that will not let the platform link the accounts. Now, Let’s create a new profile. Simply click “Create Profile” in the top left corner. You will get into the profile creation screen
You can assign a proxy for each account. Connect to a local proxy or use a third party's proxy.
Set up your profile settings
- You can change your Operating system and User Agent.
- Add your account. You can add your account platforms, Remember to enter your account details, the browser will remember your login details.
- Set up the general and advanced settings.
Run the profiles
Click on the Open button and a new browser window will open, which is where you work with the accounts. You can use it like regular Chrome (i.e. tabs, bookmarks, extensions and history), but this session is completely isolated from your device and other profiles.
Connecting your Instagram account to a DICloak profile
In this new window, log into your existing Instagram account or create a new one, just as you would in a regular browser. Instagram will recognize this browser session as a separate device, allowing you to avoid blocks for managing multiple business accounts.
After your first login, DICloak will simply remember your session (it is stored in a cloud server), so you won’t have to enter passwords or codes again.
Running multiple Instagram accounts
Next, create as many browser profiles as you need for managing multiple social media accounts. Ensure that each profile uses a different IP address. A helpful tip is to rename the proxy IPs after the corresponding browser profile names to avoid any confusion.
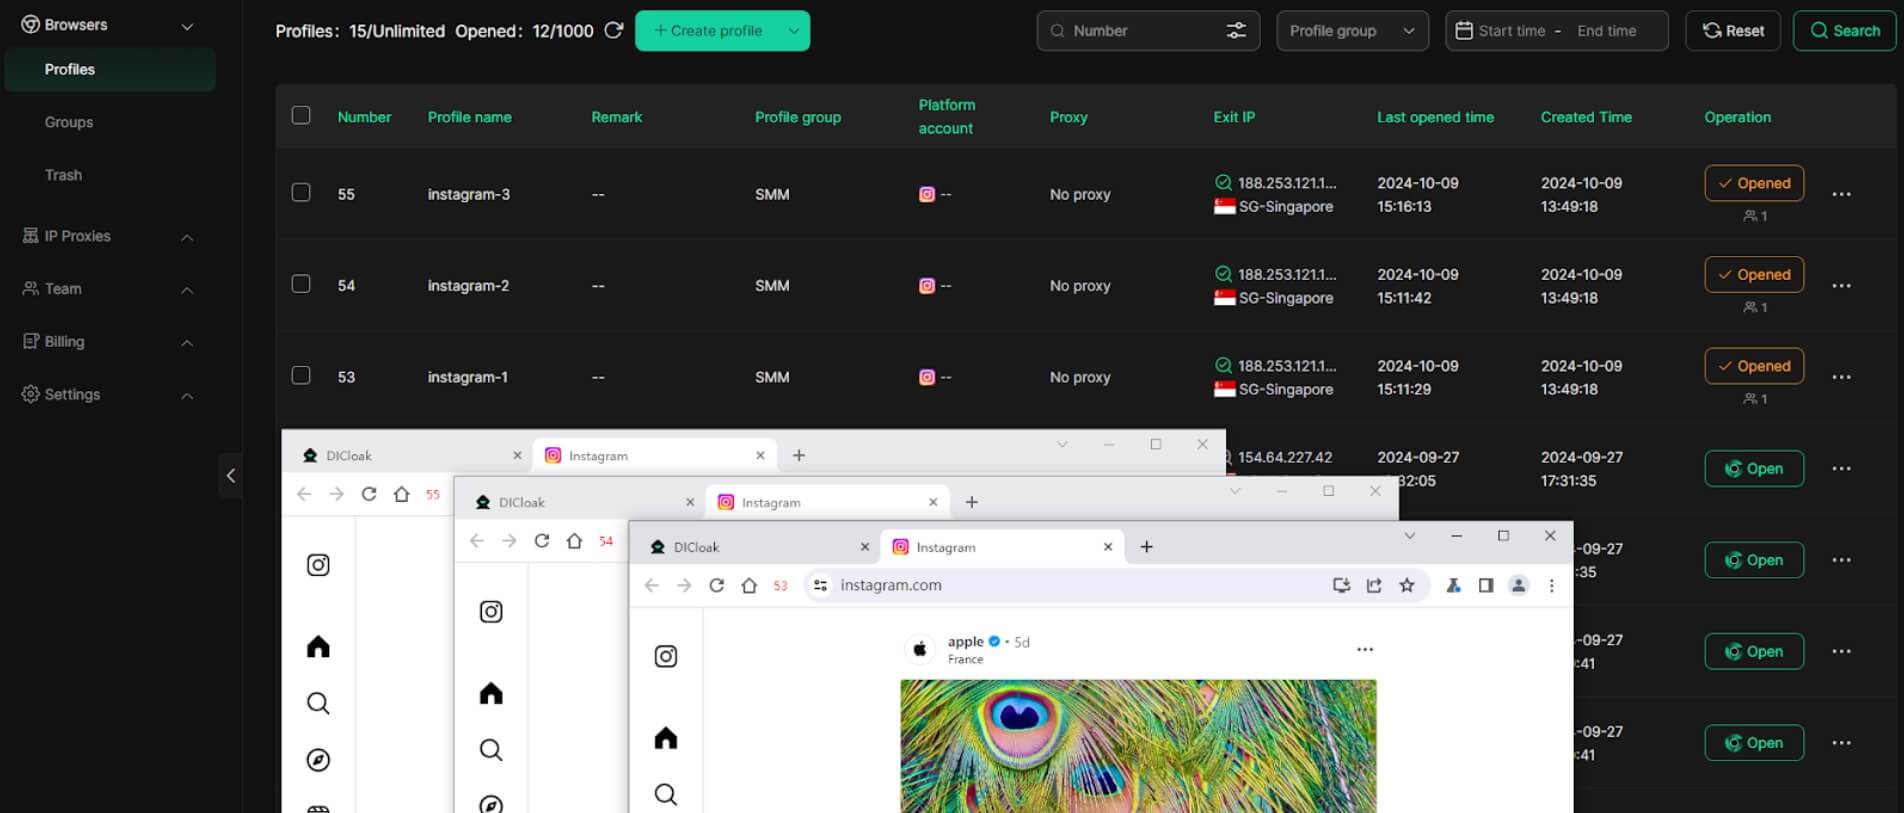
You can freely run multiple profiles at the same time with no problem. The amount of windows open simultaneously is not limited, depending only on your hardware.
When you restart the sessions, they simply continue – just like in a regular browser.


