XLogin & IPOASIS: Ultimate Tools for Securing and Managing Multiple Accounts in Online Business
In the field of online business which span various platforms and involve multiple accounts, for example, social media marketing, affiliate marketing, ecommerce, advertising etc., account security and privacy are of utmost importance. XLogin Antidetect Browser and IPOASIS are two remarkable tools. When used together, they offer a comprehensive solution to enhance security and anonymity.
Why XLogin and IPOASIS?
XLogin Antidetect Browser is a powerful tool designed to provide users with enhanced privacy and security while browsing the internet, especially when managing multiple accounts or trying to avoid being tracked. It allows users to login to various accounts on one device without detection. Users can create multiple isolated browser environments with independent and unique set of browser parameters such as UA strings, screen resolutions, and plugin configurations. For example, when multiple accounts need to be managed for e-commerce platforms or social media platforms, XLogin ensures that these accounts are not associated together by the platform's tracking mechanisms. It provides a high level of anonymity and security for users who need to operate in a stealthy online environment.
IPOASIS is primarily focused on proxy IP security. It offers IP rotation capabilities, which means that the user's IP address is constantly changing. This is extremely useful in situations where continuous access from the same IP might raise suspicion or be blocked by certain websites. Besides, IPOASIS can help you mask your real IP address when you manage multiple accounts or browsing different platforms. Your online business will be maximized when using XLogin and IPOASIS in combination.
Getting started with XLogin:
1. Download and install XLogin
Go to the official XLogin website, and then look for the [Download] button. Click the download button, and the installer file will be saved to your computer.
2. Register XLogin account
When you sign up for an XLogin account, please reach out to customer service to get a 3-day free trial. Or order a package that suits your needs.
3. Create a new profile
When you first open the browser, you will be prompted to create a new profile. A profile is like an isolated browsing environment. Click on the option to create a new profile. You will need to give it a display name. For example, if you are creating a profile for a specific social media account, you can name it after that account.
4. Configure profile settings
After creating the profile, you can configure its settings. You can adjust parameters such as the operating system, time zone, screen resolution, UA string, canvas, WebGL, fonts, language, plugins and IP address. You can choose from a variety of predefined options or customize it further to make your browsing look more unique.
5. Save the profile and manage multiple profiles
Once you have completed all the fingerprint configurations, you need to save the browser profile. You will then find it in the [browser list]. You can also choose to batch create browser profiles. Finally, launch the browser and you can start using it!
Integrating IPOASIS Proxies with XLogin Antidetect Browser:
Proxy selection in IPOASIS
IPOASIS presents a diverse range of proxy alternatives, such as residential, mobile, and datacenter proxies, each customized to meet particular demands:
- Residential Proxies: These are obtained from real residential IPs. They are highly suitable for handling social media operations or accessing content specific to certain regions without being detected.
- Mobile Proxies: With mobile IP addresses at your disposal, they are excellent for mobile marketing activities or app-testing requirements.
- Datacenter Proxies: They are a top-notch option for data-scraping tasks or large-scale automation operations.
Once you have determined the proxy type that meets your needs, just acquire a plan on IPOASIS. Then, you will be provided with a list of proxies, which includes IP address, port, and login credential.
Configure proxy in XLogin
Follow the steps below to easily and simply play with the proxy configuration:
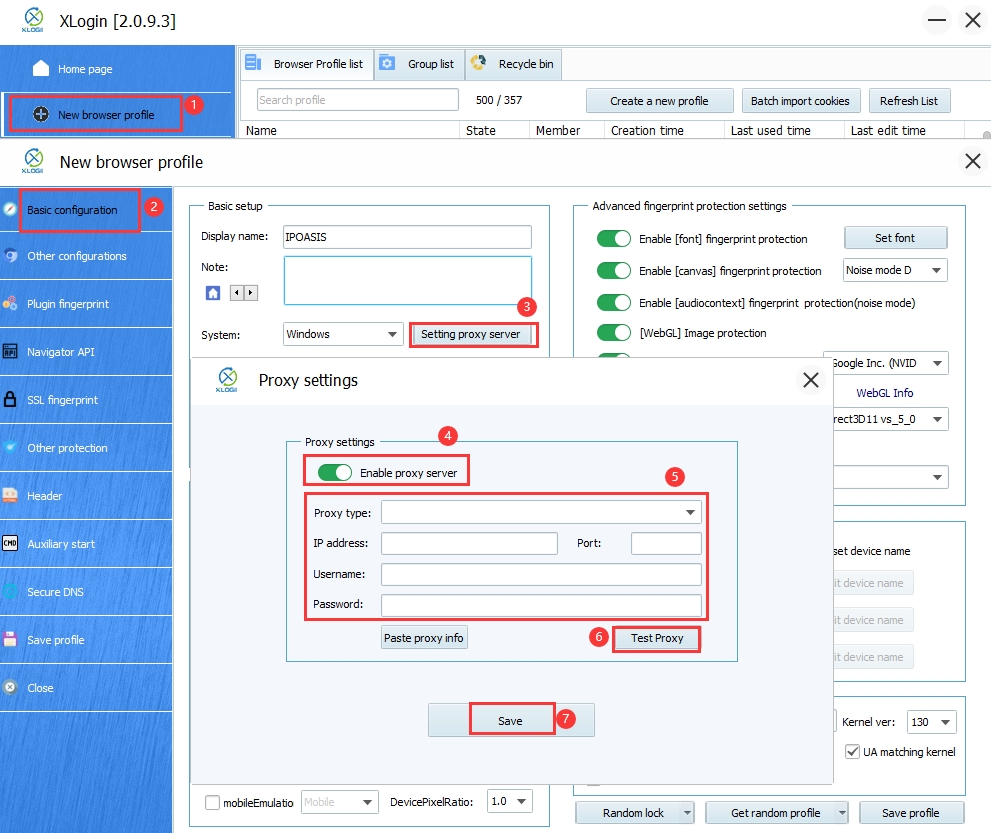
- Create the profile and set it: For the browser profile in XLogin, click on the “setting proxy server”. Then you can start adding a proxy.
- Add proxy information: Add the proxy information obtained at IPOASIS, including the IP address, port, username, and password. And you also need to choose proxy type. XLogin supports various proxy types, HTTP, HTTPS, Socks4, Socks5.
- Test the proxy: Once you have finished adding proxy info, click “Test proxy”. A successful test will display the country, region, and IP address.
- Save settings: After testing the proxy successfully, save the settings. If you need to use more browser profiles, please repeat the process. Ensure that each browser profile is assigned a separate IP address.
- Launch the browser: Now you can click on “Launch the browser” and start to use it
Manage multiple accounts with XLogin:
1. E-commerce
Reduce the risks in online retail by creating a number of isolated seller accounts on leading e-commerce platforms.
2. Social Media Marketing
Operate simultaneously with hundreds of social media accounts. For example, managing multiple facebook, twitter, Instagram, tiktok accounts on one computer to start marketing.
3. Affiliate Marketing
Reduce risks by conducting advertising campaigns via multiple advertising accounts.
4. Web Scraping
Substitute your device lab or VMs with virtual browser profiles that require fewer resources. Achieve rapid development as all browser management tools are available for immediate use. You can also use it with the XLogin automation feature.
Now try the XLogin Antidetect Browser and enjoy a 3-day free trial!


